Shortening Standard Pencil-Pleat Curtains
When you need to shorten curtains, it sometimes appears to be more complicated than it actually is. This is especially true when it comes to pencil-pleat curtains that are lined. In fact, with pencil-pleat curtains, whether you need to shorten lined curtains or unlined curtains, it makes no difference. How did you work that out..? I hear you ask.
Well, some might say it’s a trade secret but I just think of it as a logical approach to getting the job done. Are you ready..?
Shorten curtains that have pencil-pleat header tape from the top not the bottom.
There it is… the big secret. Now if that has just confused you, don’t worry, I’ll explain in more detail.
How to Shorten Curtains Step by Step:
Things You’ll Need:
-
- Tape Measure
- Step-ladder
- Pen or Pencil
- Paper
- Scissors
- Unpicker
- Pins
- Oh yes – and a sewing machine would be useful.
Step 1 – How Long..?
The first thing we need to know when we shorten curtains is – how long does the ‘finished length’ of the curtains need to be..? There are a few ways to get this measurement.
One way, and possibly the best, would be to hang one of the curtains but don’t gather it. Decide were you want them to finish, and stick a pin in at the edge. Be sure to put the pin sideways and please, don’t use a marker or pen instead. If you don’t have any pins, you may as well get some, your going to need them later.
Now, with the pin in place, take the curtain down, fold it in half length-ways and lay it on a flat surface. Measure from the top edge of the curtain down to the pin. Write down your measurement, double check it and remove the pin.
Another way which is definitely quicker but maybe not as accurate. Get somebody tall with long arms – or a step ladder, and follow steps 3 and 4 of our Measure for Curtains guide.
Step 2 – Fold and Pin
No… put the scissors down we’re not ready for those yet.
Right, with our curtain still folded in half length-ways, measure the curtain again but this time form the bottom edge towards the top. Stick a pin in one edge at the measurement we wrote down.
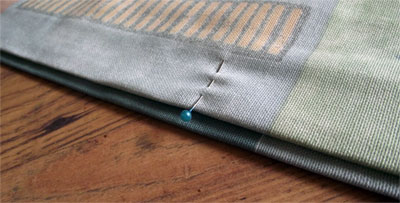 Check that the bottom corners are together and that there are no lumps or wrinkles in the edges of the curtain. Check the measurement again and put a pin in the other edge.
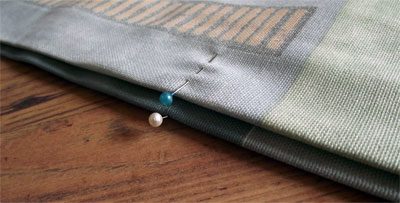 Now we open out our curtain and lay it out flat with the face fabric down. (We should be looking at the back of the curtain fabric, or lining fabric, with the header tape along the top edge). Fold the top down so that the fold is level with the pins. When doing this, we are folding so that we can see the face fabric along the top of the curtain.
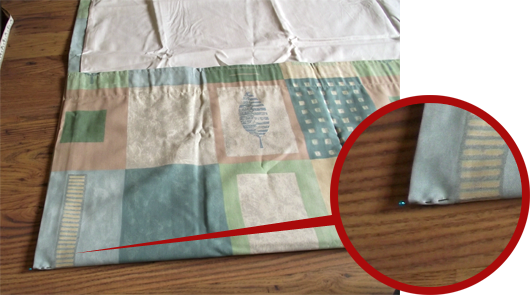 Side Note: In my many years of experience, when a customer has asked me to shorten curtains, I have often come across curtains that are longer one side than the other. This can cause problems when you shorten curtains.
So with my little side note in mind, it may be that the amount folded down at one edge is different than the other. Here’s what we’ll do…
Measure the amount folded down at each edge – Are they the same..?
- Yes..! – Measure to check we have the same distance folded down all the way along the fold.
- No..! – Work your way across measuring from the bottom of the curtain up to the fold instead. This will ensure that you have correct amount folded down.
Now we work our way along the fold pinning all the layers of curtain fabric together.
Step 3 – Move the Header Tape
Ok, so we’ve measured, folded and pinned our curtain to the length we want it. All that’s left now is to move the header tape. Grab your unpicker and yep, you guessed it, unpick the header tape. There is a quick way to do this but you first need to unpick the double stitched bit at the end of the header tape. Once you’ve done that, get a tight grip on the header tape with one hand, and on the curtain fabric with the other. Now, with a sharp tug, pull them apart. (Warning: this is not recommended with light-weight, satin or silky fabrics.)
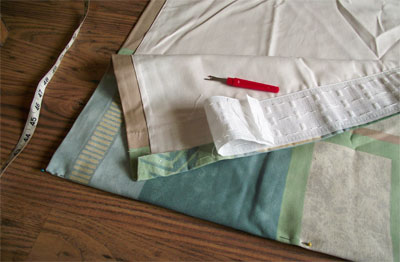 Sorry, it’s time for the boring bit now. Take your header tape and remove all the old loose bits of thread from the edges.
Done that..? – Good!… See, I said it was boring 🙂
Right, pull out the pin from one corner of the curtain and use it to attach one end of our header tape. Now, pulling the curtain fabric and header tape tight as you go. Work your way along the fold, removing each pin and replacing it to attach the header tape.
Get the scissors ready..! Before we use them though, stitch along the upper edge of the header tape. Ok, go on then – use the scissors to snip off the threads at the ends.
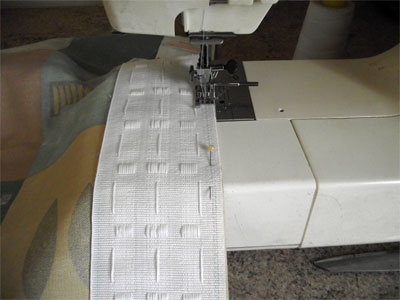 With our curtain laid out flat again, unfold the top and cut off the excess curtain fabric along the center of the header tape. Be careful to avoid the strings though, if you snip them you won’t be able to gather your finished curtain.
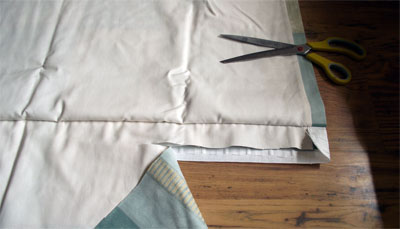 Now stitch along the bottom edge of the header tape and snip off the excess thread. TADDA – One shortened curtain..!
So now you know what to do I’ll leave you to get on with the other one – Oh yes, you can start from Step 2 this time though – (we know what the finished length needs to be now). 🙂

Thank you for that, very helpful indeed.
I knew to shorten from the top but wish I had read the advise before cutting of the top portion! I am ready to reposition the old heading tape now, so hope I havn’t created an issue for myself by not first stitching the upper edge before getting out the scissors!
Once again, thank you,
Diane
Thank you so much.This is just the sort of guide I have been looking for. Cross your fingers for me! Cheers, Natalie
Thanks for a brilliant and easy to follow simple, set of instructions. I was looking for someone to shorten my new curtains professionally because the hem of my heavyweight lined curtains looked so difficult to do myself. But I never thought to do it from the top, very clever! Looks so easy thanks a million 🙂
Have just shortened a pair of curtains using this method and cannot believe how easy it was.Thank you so much for sharing.
Thank you so much for these easy to follow instructions, I have shortened a 90″ drop lined pair of heavyweight curtains to 60″ for my daughter with ease, I couldn’t have done it without you. I only looked on the offchance I could get a few tips, would never have done them this way. You are a star 🙂
Thank You for your feedback we are so pleased you found our site useful. 🙂
My very first attempt at taking up curtains; I followed your fab instructions and hey presto, there they are, a few inches shorter!! I’m very chuffed with myself so a huge thank you to you!! :0)
Congratulations Katie, now you know how to shorten curtains there can be no stopping you 🙂
Absolutely genius idea! I was so nervous about shortening a brand new pair of curtains but this was a fool proof way to do it with such precise instructions thank you so much 🙂 xxxxx
Do you recommend – that with ready made curtains ( If they are cotton ) – we should wash them first – before attempting to alter the length. – I have bought a pair of curtains that need shortening quite a bit – but want the finished length to have a 7ins hem. Many thanks indeed.
Hi Vivien, Yes – unless your ready made curtains require dry cleaning, I would definitely recommend washing them before altering the length.
I have never tried to shorten curtains so I am glad I read this first as I would have shortened from the bottom. Despite thinking I might just alter the bottom instead anyway (as I still thought this would be easier) I followed these instructions and I am very proud of the results. Taking the tape off at the top was very easy, just as you described and it saved me from messing around with hemming at the bottom. Thank you for saving me a lot of time and frustration! I am going to have a go at making some from scratch today.
I have just followed your instructions to shorten lined pencil pleat striped John Lewis curtains and they look amazing! No one will ever know I’ve done it myself. I have shortened curtains before and it has never occurred to me to do it this way. Thank you!!
I would like to thank you for such an easy way of shortening curtains. Before today I have only messed around with the sewing machine I was given when I was a child. This was so well explained I have shorten my curtains and they look brilliant thank you.
I have followed the instructions above, which were easy to follow. However I’ve just tried to put the header tape back on and it’s now not long enough! I’ve just pinned it back on before sewing and it’s at least 20cm too short – I have not cut it at all! Any advice other than buying new header tape?
Hi Alicia, Really the only solution is to stretch the header tape as much as you can when you pin it. That will of course also mean you would need to stretch it out as you stitch it in place which can be rather difficult. I would strongly suggest that you do in fact purchase new header tape.
Thank you so much ..that was very helpful indeed…:-)
Hi
Found this extremely usefull for one pair of curtains I need to shorten but plead could you advise me on the following?
I bought curtains to match bedding in my caravan and the curtains only one in 66 x 72. The width is fine but the fnished length needs to be 48. Simple you may say only the curtains has pattern that is about 18 inches that runs across the top and rest in plain cream. I want to keep the pattern. Any suggestions please.
Kind regards
Julie
Hi Julie, sadly in this case, this guide is not suitable for your curtains. They would need to be shortened from the bottom rather than the top.
Help. I’m trying to shorten old ready made lined curtains and am following your instructions. Problem is that the curtains are double width and the curtain fabric is about 2 inches wider than the stitched in lining so I am getting a ruck in the outer fabric. I think it’s stretched out of shape. Can you advise please. Tricia
Hi Tricia, it is normal for the lining to be narrower than the face fabric. As you can see in the photo for step 3, the face fabric folds back on itself to join to the lining fabric. Take your curtain and lay it out flat with the face fabric down. Now adjust the lining so that you have an equal amount of the face fabric down each side. Both layers of fabric should now be smooth and flat with no rucks. Measure from the bottom up each edge and put a pin at your required finished length. Next, fold the top of your curtain down to level with your pins (see step 2) and pin along the fold. Then continue with step 3.
I hope this helps
What great instructions, I was dreading shortening some curtains but after Googling and coming across this site I’ve shortened two floor length curtains in 2 hours-why didn’t I know this before?!
Thanks Gillian.
Umm… because you didn’t visit us here sooner 😉 – But hey, now you know, there’s no stopping you.
Although I haven’t had a go at my curtains yet – still trying to muster up the courage – I’ve just read your instructions and the dread I was feeling has almost completely gone! I would never have thought form going from the top and that it woul dbe so simple! I’ll let you know how I get on! Do you have such simple and easy advice on how to make sofa cushions out of the remaining fabric as that’s obviously my next job?!
Thanks
Kate
Hi Kate, I’am glad to hear my instructions have given you a boost in confidence, it really is quite a simple task. Please do let us know how it go’s. Regarding advice for cushions – I’ll see if I can put something up in the next week or so. I have been rather busy lately though so can’t make any promises how soon it will be.
Thank you very much for this advice. I bought a pair of curtains in the sale for my daughter’s bedroom, but as it was my luck the curtains were only available in a longer length, so your instructions will certainly come in handy!
Thank you so much for this tutorial – just managed to shorten two pairs of curtains and they are perfectly even thanks to your instructions.
Excellent advice and instructions told my family about my shortened curtains and they’re very impressed. Thank you.
Thank you so much! It worked a treat and so easy to follow. I have never done anything like this before and having used my new machine to do it was great too.
2 done and now 6 more sets to do so I’ll get plenty of practice.
Happy New Year!
C x
Thanks so much! Was about to chop off the bottom of some too long ready made curtains when I came across this guide. So much more sensible to do this way and your instructions are spot on! Still to dig the sewing machine out but got everything pinned in place and feeling quite optimistic!
Thank you for such clear instructions that a complete novice was able to follow. I shortened 2 sets of curtains today and am so pleased with them (and myself). I would definitely have, wrongly, taken them up from the bottom but this was brilliant.
Thank you so much for this. I managed to get myself a bargain in the Laura Ashley sale saving over 225.00! I followed your instructions and it was so simple to do thank you, saves all that hemming and pressing! I wish I had read the blog before I bought my header tape! Still at least I know how to take it off now and I have saved it for future projects.
Thanks again, the instructions were clear and just perfect! My curtains look professional and I have saved a fortune!
Never to old to learn. I am over 75 and have just found this site while I pondered over what to do with my time during the coming winter months. Being male I considered many other constructive ideas but alas found your instructions so clear cut and easy to follow that I felt I just have to give it a go. Here’s hoping that I am successful and even end up with a home made for me with your help
Just what I was looking for. I had a vague memory that it’s easier to shorten curtains from the top but none of my sewing bibles mentioned it so I thought maybe I had it wrong. A bit of searching and I came across this. Thank you so much for an excellent set of clear instructions. I can now repurpose a set of curtains instead of buying new 🙂